Creating a custom DTF gang sheet is one of the most efficient ways to maximize your print space and save money on your transfer orders. Whether you're printing multiple designs or repeating the same artwork, our gang sheet builder makes the process simple.
Follow the steps below to create your own custom DTF gang sheet.
Step 1: Visit Our Website
Start by visiting the Rolled Up Printing website
Once you're on the homepage, you're ready to begin building your gang sheet.
Step 2: Navigate to the Gang Sheet Builder
At the top of the homepage, hover over the DTF Transfers menu. From the dropdown options, select Build Your DTF Gang Sheet.
This will take you directly to our gang sheet ordering page.
Step 3: Choose Your Gang Sheet Size
You'll see several gang sheet size options available. The size you choose will depend on both the number of images you want to print and the dimensions of those images.
For example, if you select a 22" x 24" gang sheet and your design measures 10.5" x 11.5", you would be able to fit approximately four images on that sheet.
Before selecting a size, consider how many designs you'll be printing and the final dimensions needed for each design.
Pro Tip: Pick a sheet smaller than you needed? That’s okay, you can increase the size in the top left corner, where it says the current size, and keep building!
Step 4: Upload Your Artwork
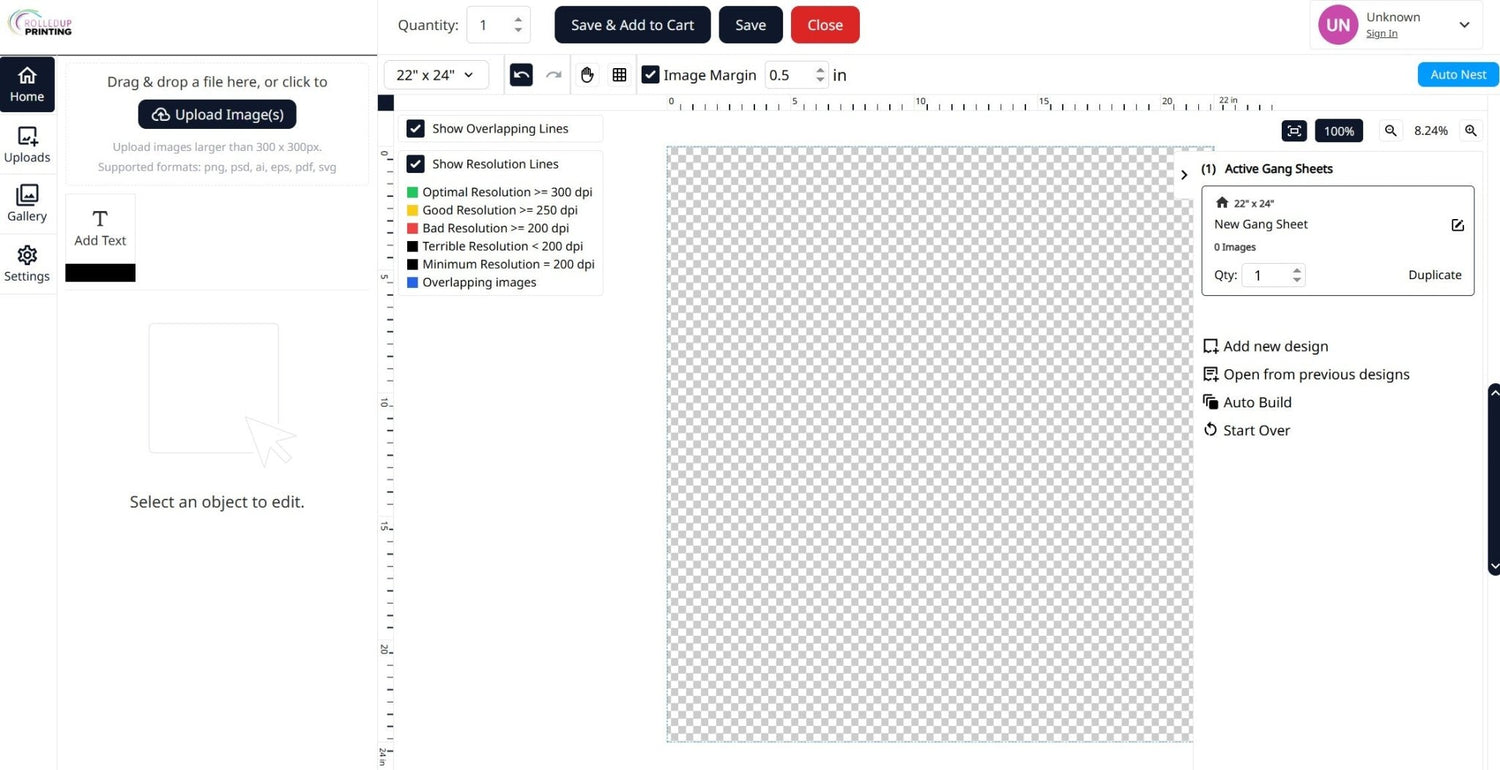
After selecting your sheet size, the gang sheet builder will load.
On the left side of the screen, click Upload Images. You can upload multiple files at once by holding Shift or Ctrl/Command on your keyboard while selecting your artwork files.
Uploading everything at once can help streamline the design process.
Step 5: Resize and Position Your Images
Select an image on your gang sheet. You'll know it's selected when you see the five black dots around it.
You can resize your artwork in several ways:
- Enter custom dimensions using the Width and Height fields
- Use the Aspect Ratio setting to maintain proper proportions(recommended)
- Click the lock icon if you'd like to adjust proportions independently
- Click and drag the corners of the image to resize manually
As you scale your artwork, be sure to keep the intended product size in mind to ensure your transfers print at the correct dimensions.
Pro Tip: If your image has a lot of blank space around it, crop that away so when you size your image that isn’t included.
Step 6: Add Multiple Copies
Need more than one copy of a design? There are a few easy ways to duplicate images.
You can:
- Click the image thumbnail on the left side
- Use the Duplicate Image feature
- Use Auto Fill Sheet to automatically populate the remaining space with duplicates
You'll also notice a Margin setting. This controls the spacing between duplicated images when using Auto Fill Sheet or Duplicate Image.
Keep in mind that the margin setting only applies to automatically duplicated artwork. If you're manually positioning images, you'll need to create spacing yourself.
Step 7: Check for Errors Before Printing
Before submitting your gang sheet, it's important to review both image quality and layout.
Check Your Image Resolution
For best print results, artwork should be close to 300 DPI
When an image is selected, its DPI information will appear on the left side of the builder. You'll also see a quality guide indicating whether the resolution is suitable for printing.
A few important things to remember:
- Reducing an image size increases its DPI
- Enlarging an image decreases its DPI
- Images downloaded from websites are often lower resolution and may appear pixelated or grainy when printed
-
Always ensure you have the legal rights to use any artwork you upload
Please note if an image is already lower quality, taking it into a program and increasing the size will not increase the dpi of the image.
Check Your Layout
Next, verify that:
- No images overlap each other
- No images extend beyond the artboard boundaries
If either issue occurs, an error message will appear at the top of the builder.
To fix these errors, you can:
- Rearrange your artwork
- Resize images
- Upgrade to a larger gang sheet size
Step 8: Save and Add to Cart
Once you've confirmed that everything looks correct, click Save & Add to Cart.
You'll be prompted to:
- Name your design
- Review any quality warnings
- Select Print Anyway if you choose to proceed despite warnings
- Confirm that your artwork is print-ready
- Click Add to Cart & Exit
Your gang sheet is now ready for checkout.
Additional Tools You Can Use
Fit Check
Use Fit Check to preview mockups and determine the recommended image sizes for specific products
Remove BG
The Remove BG tool automatically removes image backgrounds. While it works well for many designs, highly detailed elements such as hair may require additional editing.
Auto Fill Sheet
This tool automatically duplicates your selected image until the available sheet space is filled without exceeding the print area
Duplicate Image
Duplicate Image creates additional copies of your selected design until the next copy would extend beyond the sheet boundary. At that point, you'll have the option to start a new sheet or cancel the duplication process.
Building a DTF gang sheet doesn't have to be complicated. By selecting the right sheet size, maintaining high-resolution artwork, and carefully reviewing your layout before submission, you can ensure professional-quality transfers every time.
You can also check out our Pre Made DTF Sheets or DTF by Transfer Size or if you have already create your gang sheet, you can select Upload Your DTF Gang Sheet on the DTF Transfers menu from the home page, or selecting one of the links below.
Upload Your DTF Gang Sheet Now
Pre Made DTF Sheets
DTF by Transfer Size
Leave a comment
This site is protected by hCaptcha and the hCaptcha Privacy Policy and Terms of Service apply.